How to attract, care for, and photograph hummingbirds
How to attract, care for, and photograph hummingbirds
The wings of a hummingbird move incredibly fast! Trying to get a photo of a hummingbird where the wings are anything but a blur, can be very challenging with natural light photos. As mentioned in my post How to take great hummingbird photos, to capture sharp images of hummingbirds, you'll need a very fast shutter speed, requiring a very bright day and/or very high ISO settings. High ISO settings can add a lot of noise and reduce the sharpness of the photo, so it's always a compromise. Even with shutter speeds of 1/2000 of a second, the wings of the hummingbird will still be blurry in most shots. It's only when you get lucky and capture that brief fraction of a second when the wings are changing directions that you can get shots without too much blurring of the wings. Even then, they still won't be razor sharp! If you're going to use natural light, you'll want to shoot for as high of shutter speeds as possible. Even with a shutter speed of 1/5000, the wings can still be a bit blurry.
If you really want to get sharp images without the motion blur, using flash, or photo strobes, is one way to achieve that. However, not just any flash or photo strobe will do the trick, you either need a photo strobe that has a high speed "action" mode, or you may need to use the multi-strobe technique.
High Speed Action Mode
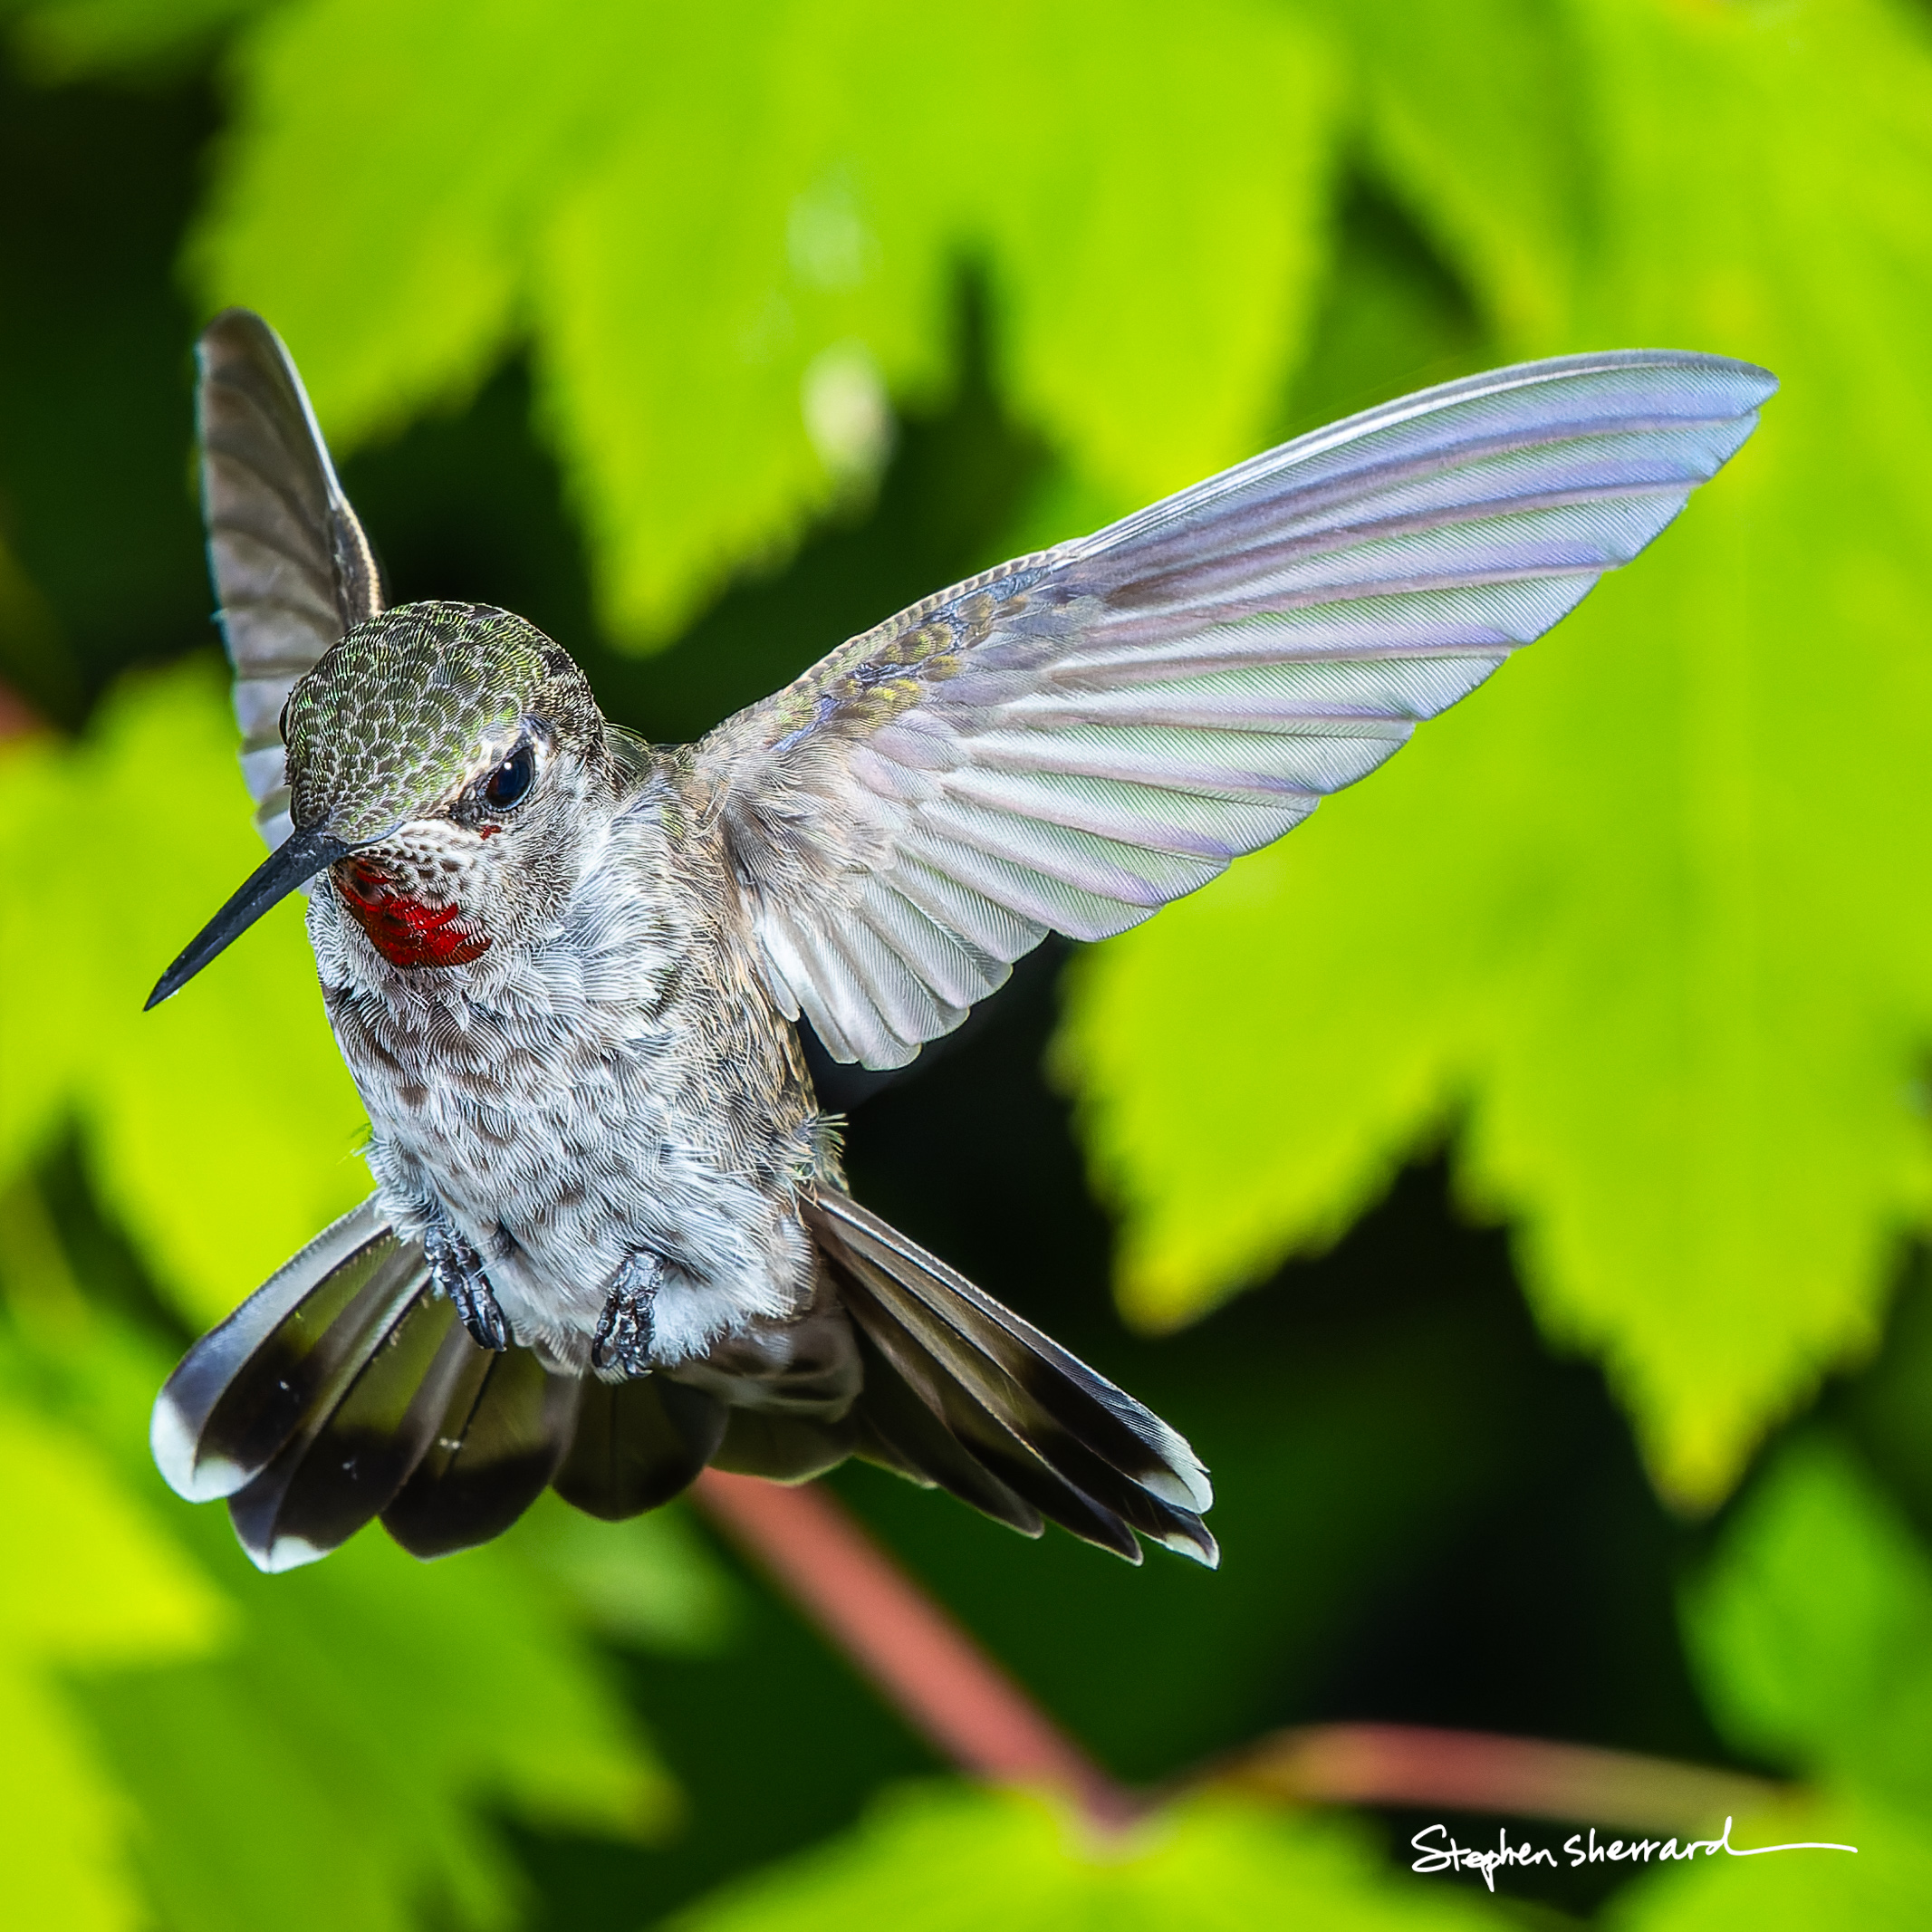
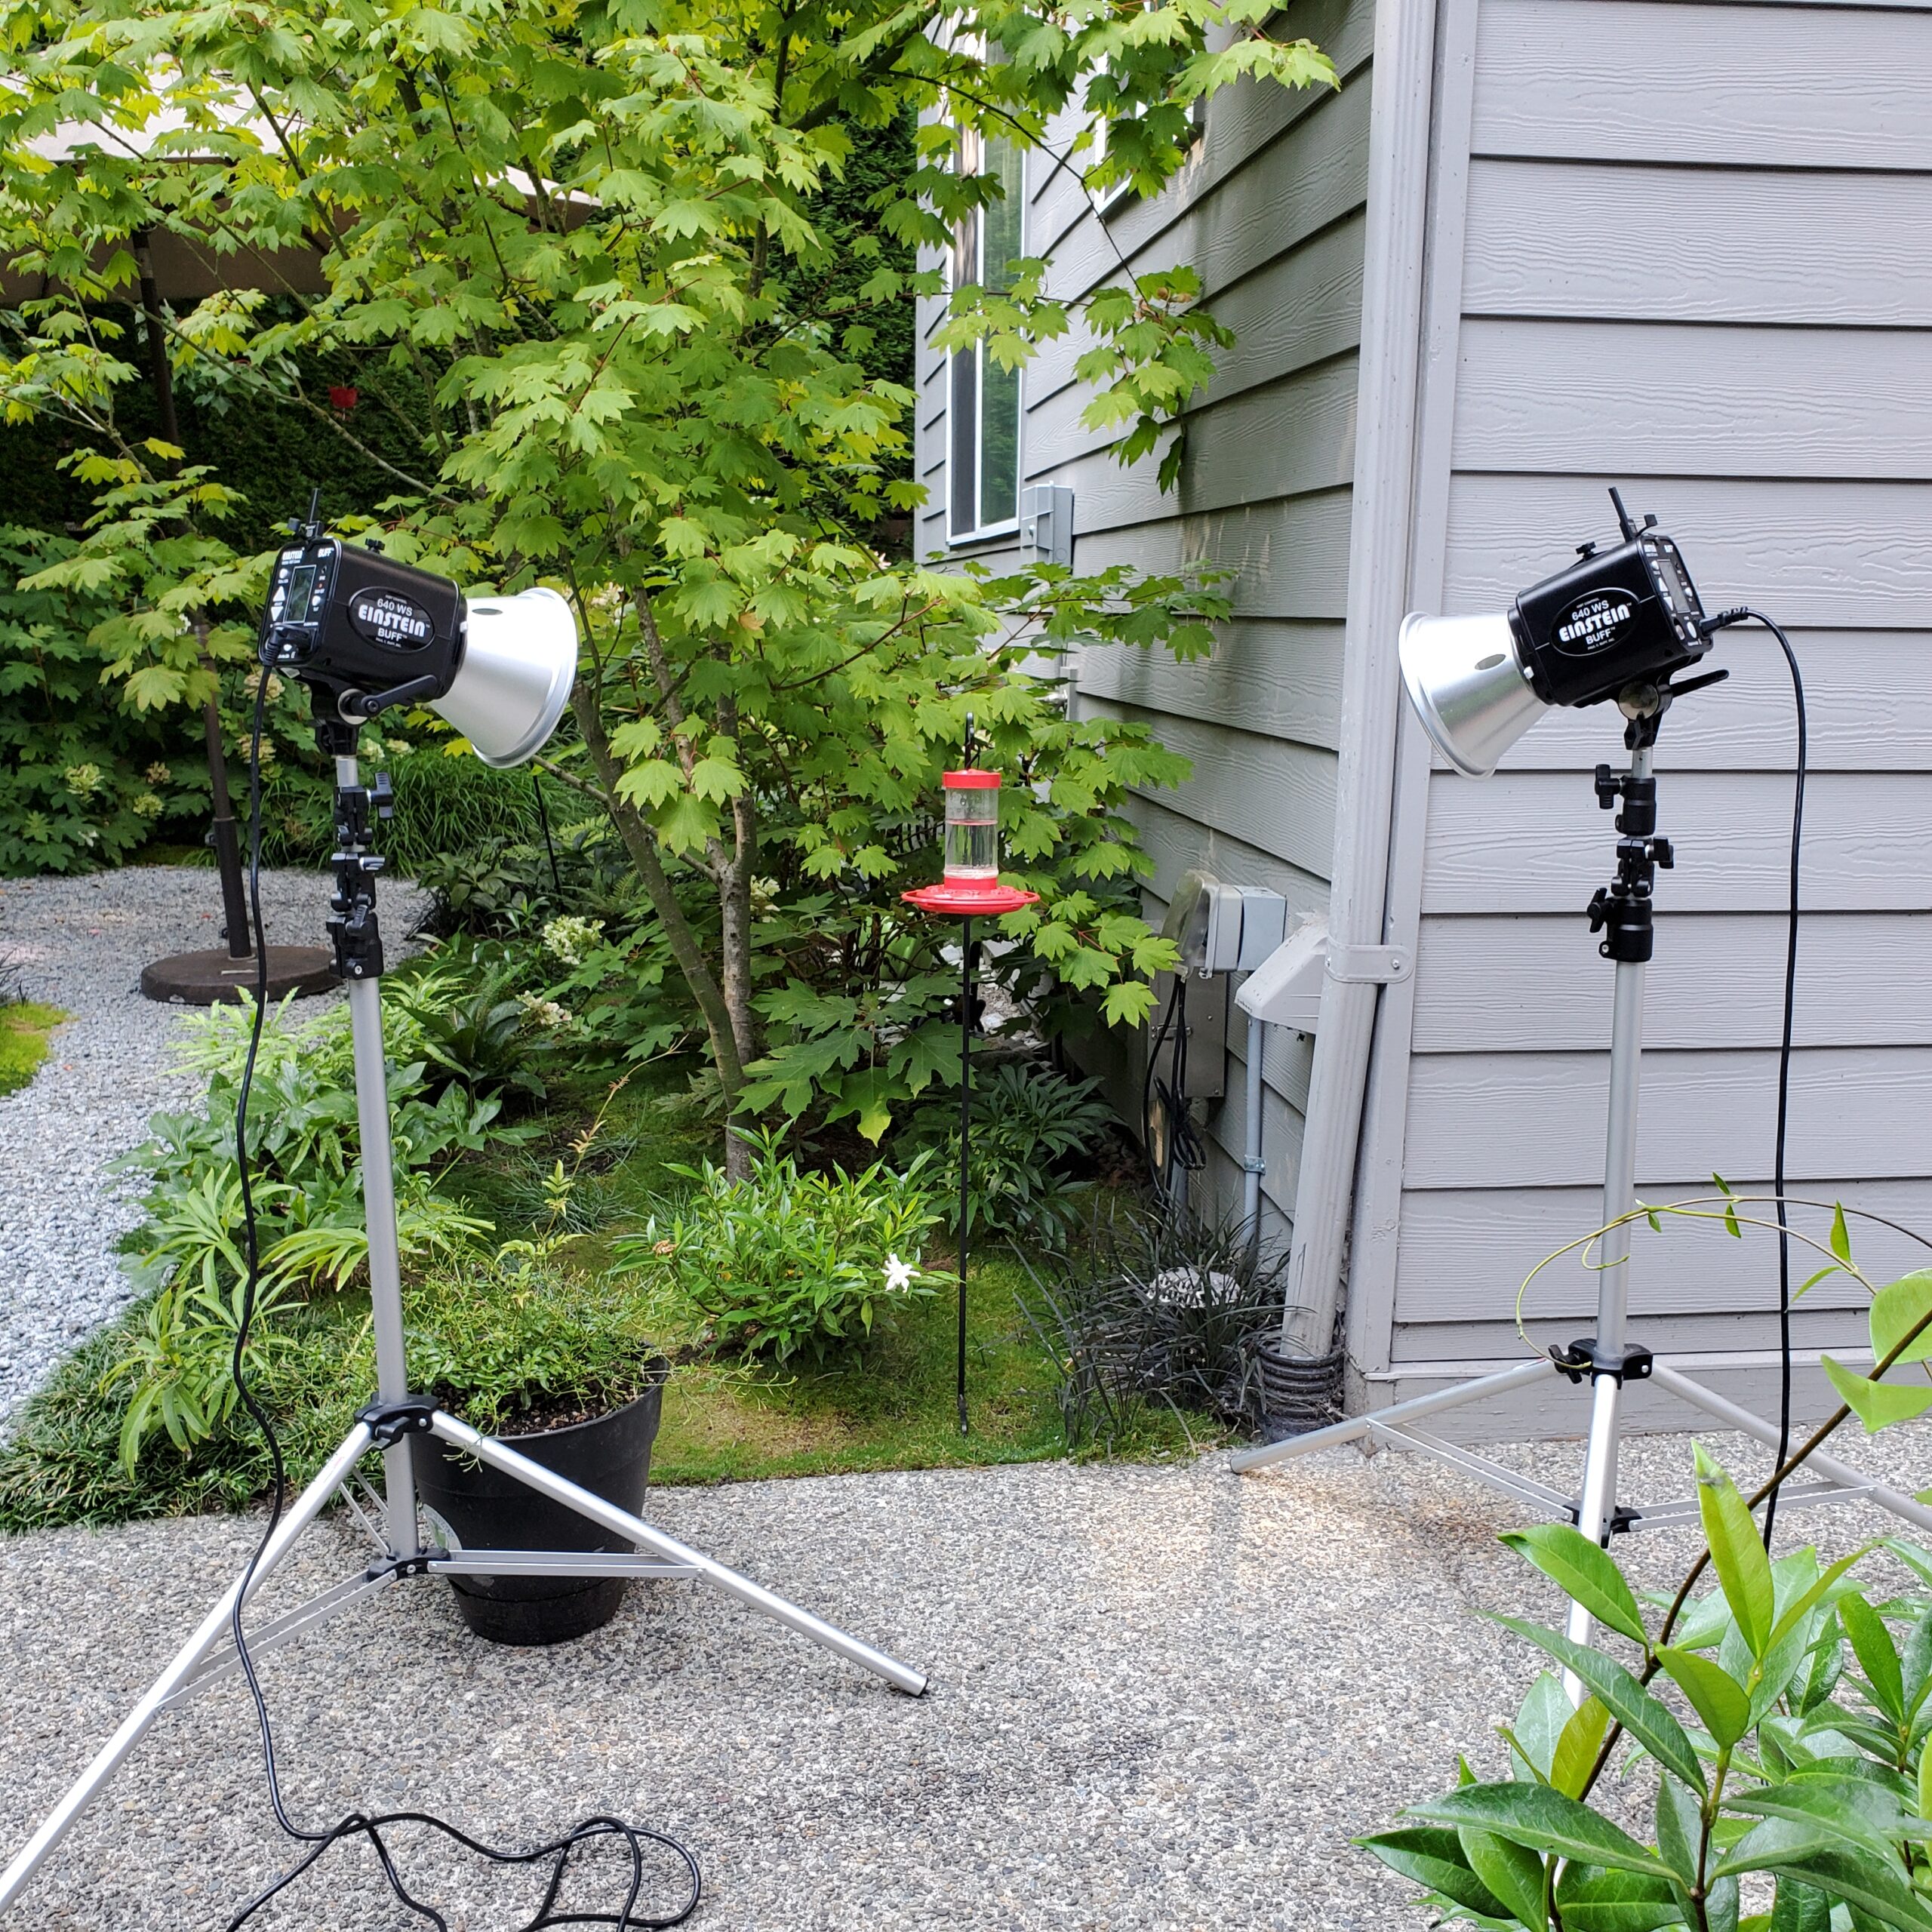
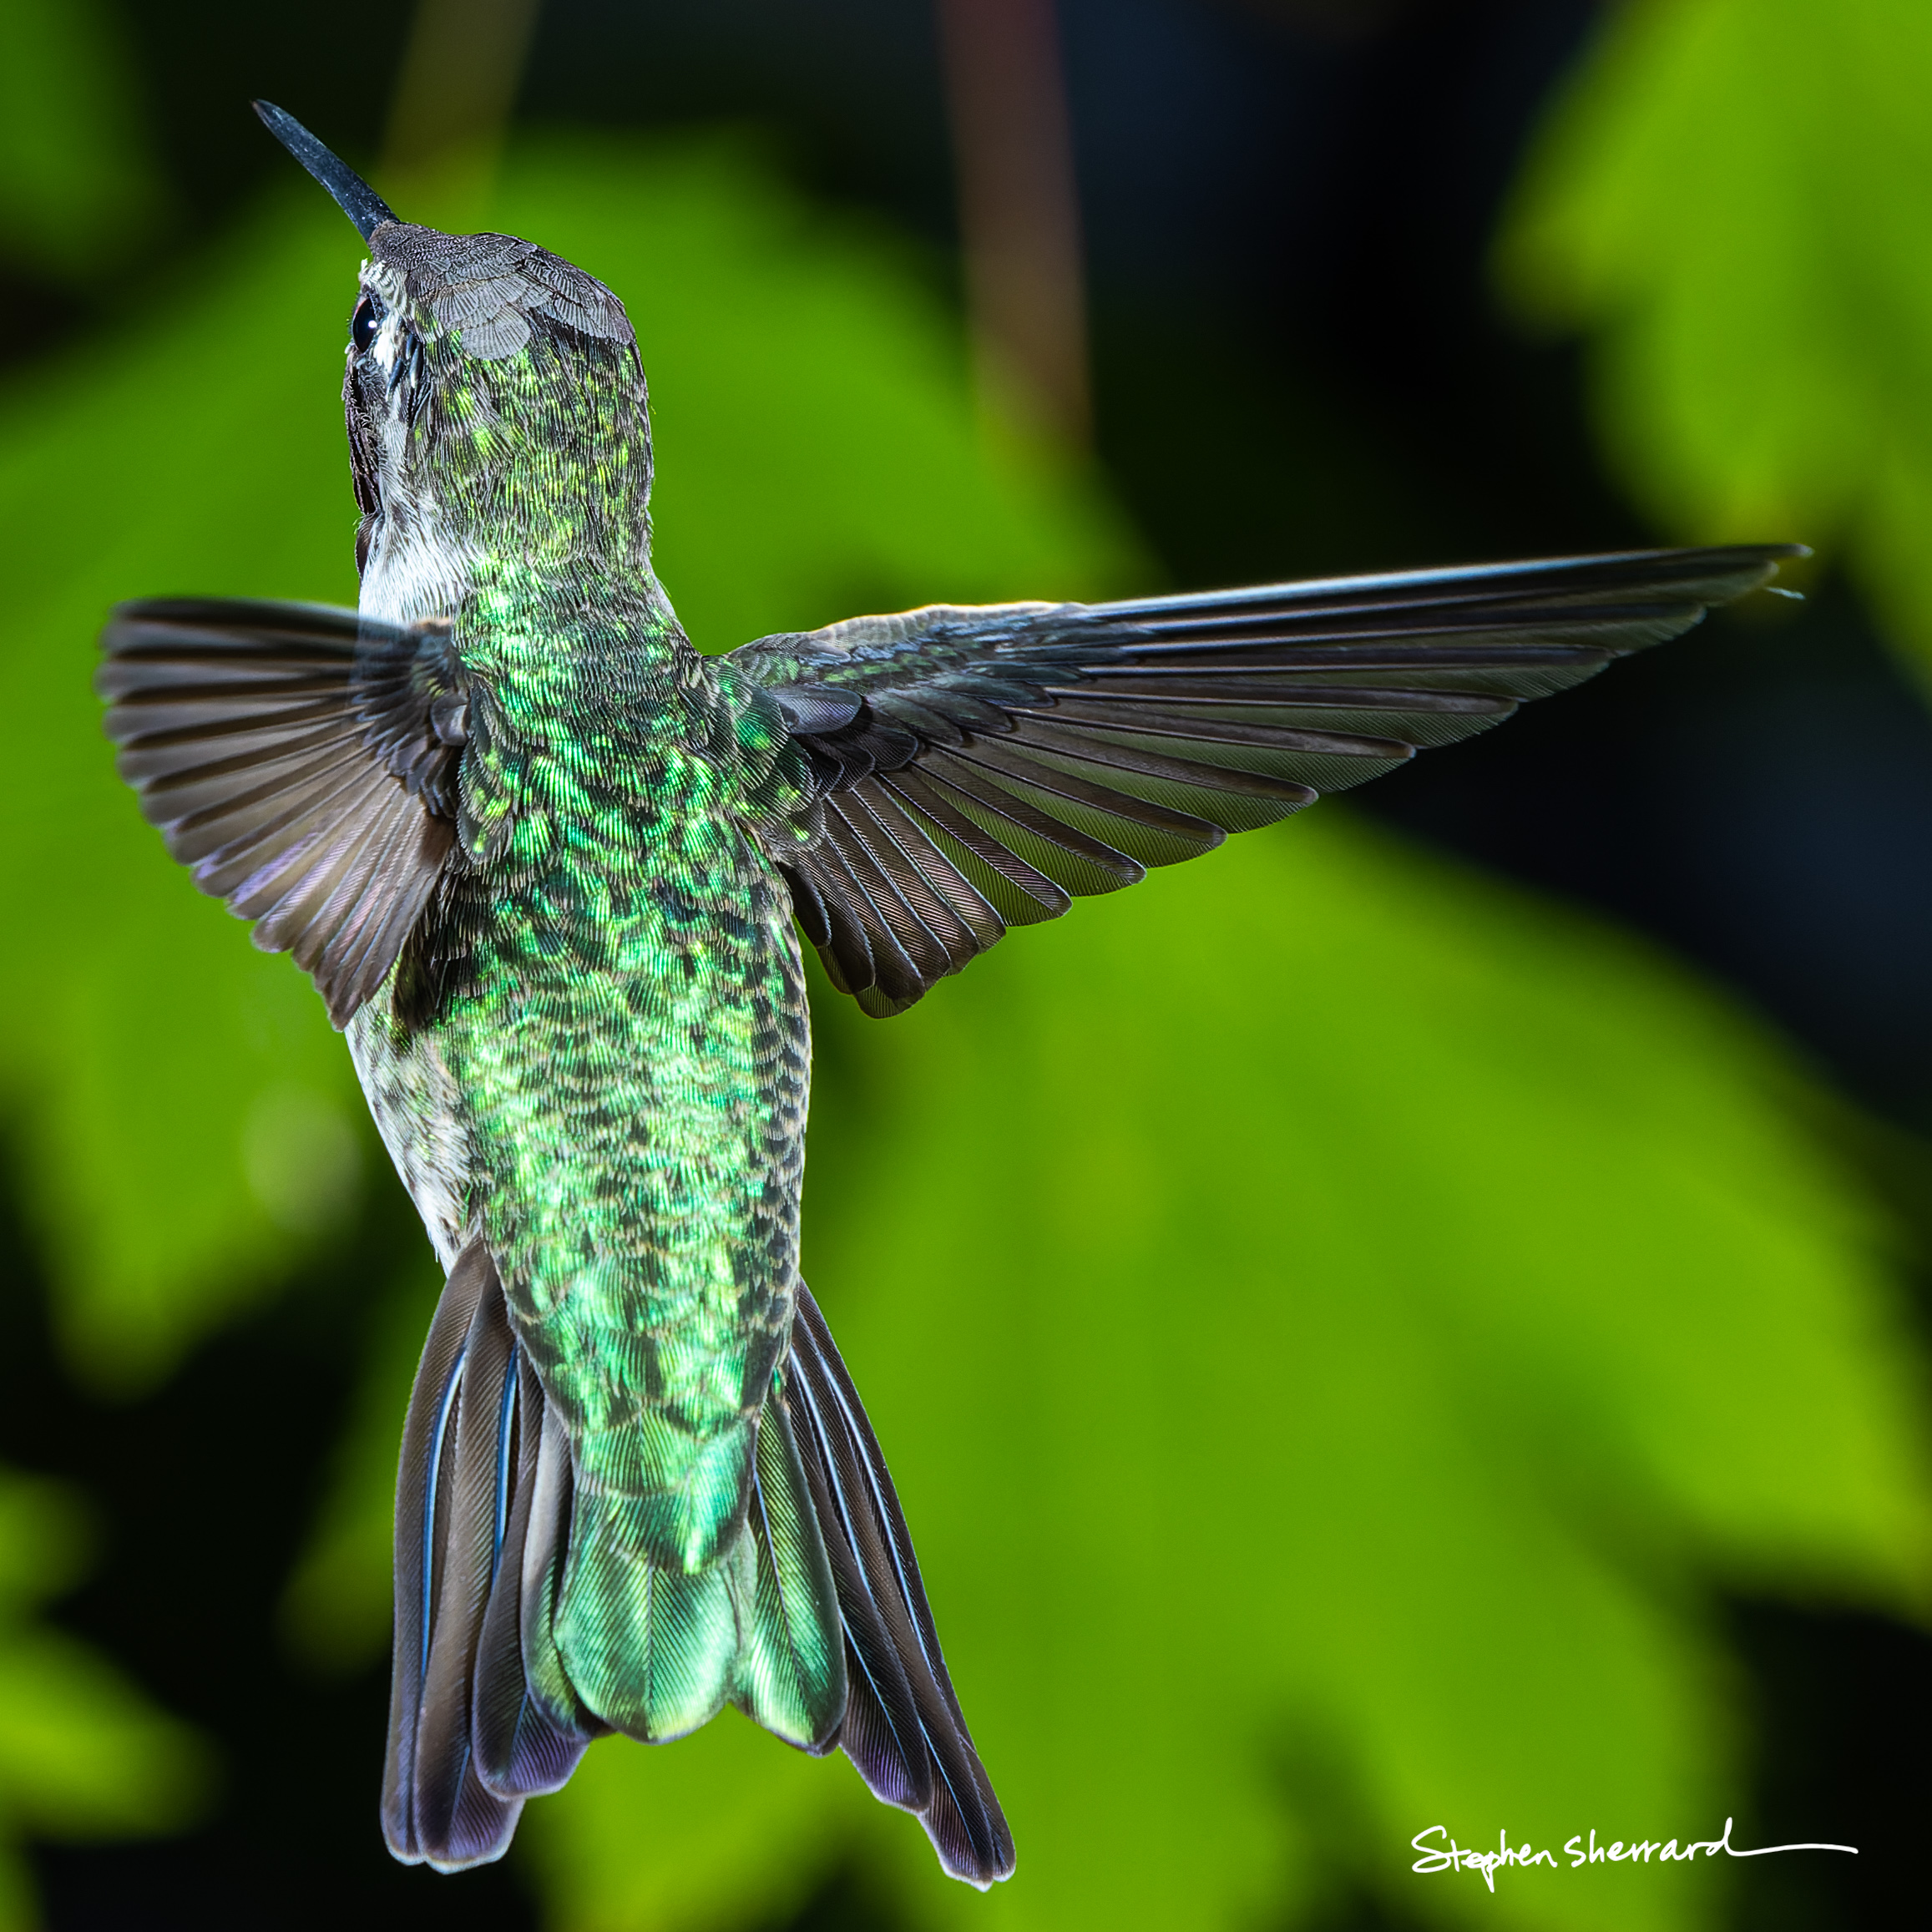
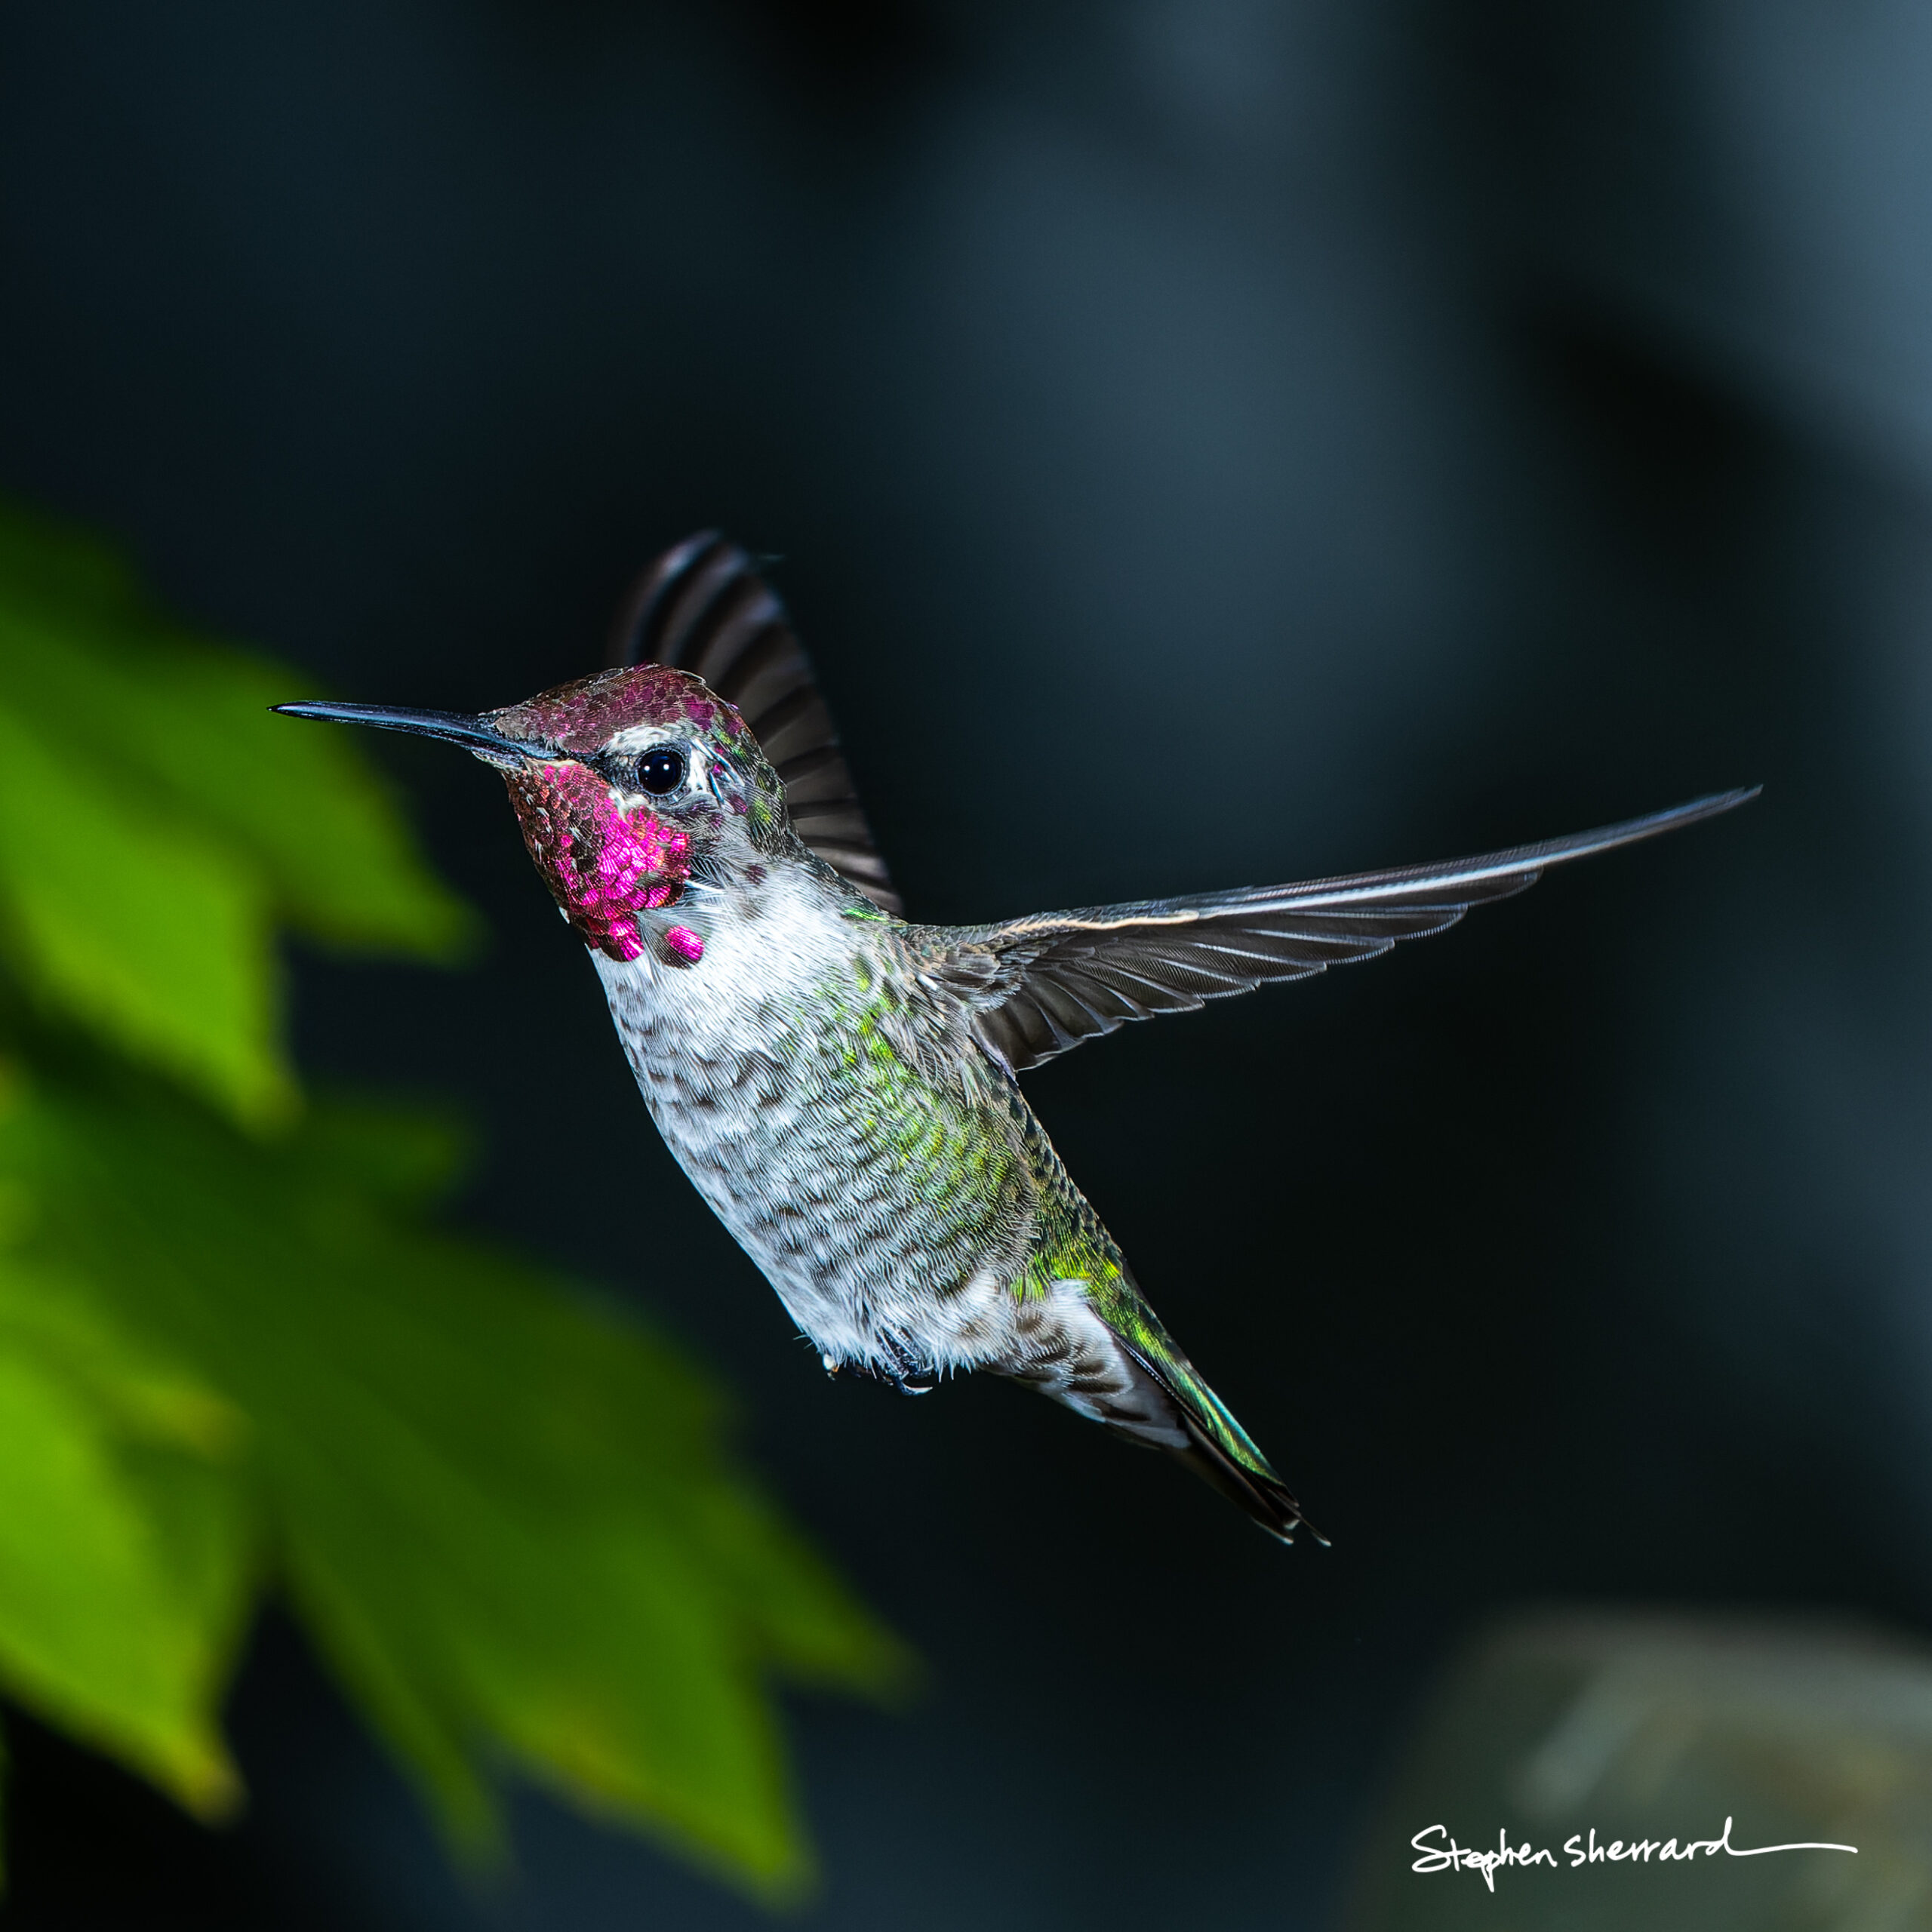
Not to be confused with high speed sync, high speed action mode is a mode that some flash units have where they will create an ultra-short duration flash of light that is meant to stop fast moving objects (think of milk/water drop photos). Most regular flash units and studio photo strobes have a much longer flash duration (depending on the power output setting) that would not be fast enough to stop very fast moving objects, such as our hummingbird wings. By using one or more of these strobes in action mode, you can get very sharp photos that freeze the action. The photos on the right show one of my simple setups with two Paul C Buff Einstein photo strobes set to action mode, and some of the photos I took with that setup. I kept them at almost the lowest power output, and then raised my ISO to 800, so I could then shoot at an aperture of f11 for more depth of field and sharpness, as well as to make sure the natural light was far enough below my exposure settings to introduce any "ghosting".
Multi-Strobe/Flash Technique
When I started taking hummingbird photos I was not aware of this technique until I saw in referenced in the notes of some other hummingbird photos. Many of the Speedlights for popular cameras actually can have a very short flash duration, in particular when they are set to the lowest power setting. However, at the lowest power settings, they may not output enough light on their own to overpower the natural light. So, many of these photographers use up to 8 of these smaller Speedlight style flashes (often very cheap flashes from other companies). They will often have 4 or 5 of them aimed at where the bird is going to be, and then 2 or more flashes to light the background (sometimes they use a big printout of a blurry background as a fake background they can light up right behind the hummingbird). The combination of multiple flash units will provide enough light to overpower the natural light. By setting them all to their lowest output settings, their output duration is fast enough to stop the action. Note that you would need optical triggers, or a multi-unit sync cord connection, to get them to all fire in sync with each other.
If you've already got one or more Speedlight type flash units for your camera, and want to learn more about the multi-flash technique, below are some articles I found when I first started researching this technique. I do have one Canon 580EX flash, but all my other flashes are studio type photo strobes, with only two of them having the "action" mode, so I haven't tried taking hummingbird photos with more than a few of my studio strobes.
Hummingbird photography using multi-flash techniques - by Rick Dunlap
Hooked on hummingbird high speed flash photography - by Patricia Ware
Ghost Images
One thing you need to watch out for when using flash/strobes is that if you don't overpower the existing natural light, you may get ghost images (see the last image in the gallery for an example). Most cameras have a relatively low flash sync speed, usually anywhere from 1/60 to 1/200. At that shutter speed, with a fairly wide aperture, and a sunny day, the natural light may be very close to your exposure settings for the flash, and so you'll see some blurry ghost imaging caused by exposure from the natural light. Especially if you are increasing your ISO to keep you flash power at its lowest setting, you need to check your natural light exposure levels. For the shots without ghosting in the gallery, I increased my aperture to f11 to make sure I wouldn't get any ghosting from the natural light since I had my ISO at 800. My camera also allows me to increase the shutter speed to 1/250 when using the electronic first curtain shutter mode, and so that helped as well. Plus, it was late afternoon on a cloudy day, so I didn't have to worry too much about bright sunlight and ghost images. The shot where there was some ghosting was from a brighter day, and I was at 1/200 shutter speed and a wider aperture as well, so the natural light was only 2 to 3 stops below the flash exposure, enough to create some ghost imaging. At the time, I was playing around with trying to use the natural light to light the plants in the background, and then stop the action of the bird with the strobes. The ghosting can lead to some interesting images, but I prefer the later setup without ghosting where I used the feeder right up against one of our trees so that the strobes would light up the leaves, providing a nice background that isn't all black.
One Shot At A Time
The other downside of using flash/strobes is that you can't use your high speed drive to fire off multiple shots each second, which generally increases your changes of getting a good shot. Instead, you have to fire one shot at a time, and wait briefly for the flashes/strobes to charge back up. If you're at, or near, the lowest power settings, though, this time is usually quite short (1 second or less), so you can usually take shots almost as fast as you can press the button, release, and then press again.